どうも、ちょげ(@chogetarou)です。
Drawerの下部にボタンを表示する方法を紹介します。
方法

Drawerの下部にボタンを表示するには、ColumnとExpandedを使います。
まず、Drawerで表示しているウェジェットをExpandedでラップし、Columnのchildenにします。
Drawer(
  child: Column(
    children: [
      Expanded(
        child: /*Drawerで表示しているウェジェット*/,
      ),
    ],
  ),
),
そして、Expandedの後ろにボタンを配置します。
Drawer(
  child: Column(
    children: [
      Expanded(
        child: /*Drawerで表示するウェジェット*/,
      ),
      TextButton(
        onPressed: () {},
        child: Text('Close'),
      ),
    ],
  ),
),
これでDrawerの下部にボタンを表示することが出来ます。
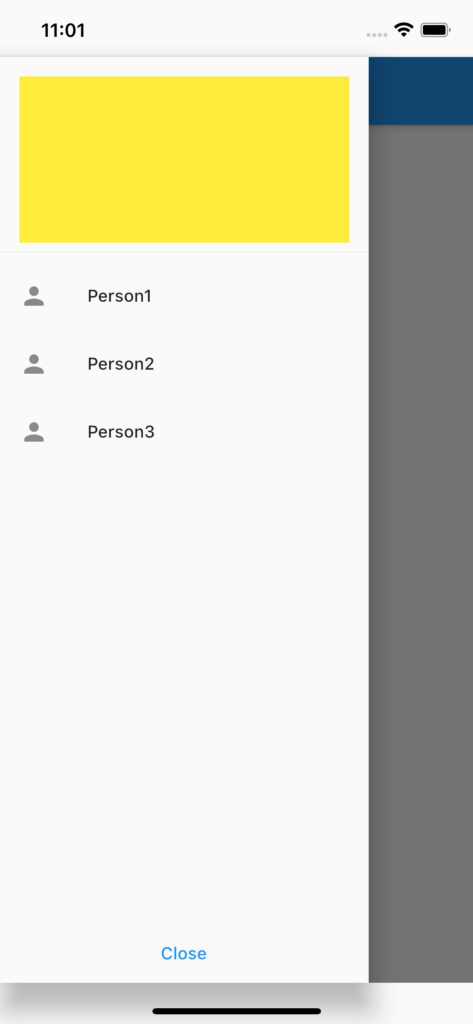
使用例
  @override
  Widget build(BuildContext context) {
    return SafeArea(
      child: Scaffold(
        appBar: AppBar(),
        drawer: Drawer(
          child: Column(
            children: [
              Expanded(
                child: ListView(
                  children: [
                    DrawerHeader(
                      child: Container(
                        color: Colors.yellow,
                      ),
                    ),
                    ListTile(
                      leading: Icon(Icons.person),
                      title: Text('Person1'),
                    ),
                    ListTile(
                      leading: Icon(Icons.person),
                      title: Text('Person2'),
                    ),
                    ListTile(
                      leading: Icon(Icons.person),
                      title: Text('Person3'),
                    ),
                  ],
                ),
              ),
              TextButton(
                onPressed: () {
                  Navigator.pop(context);
                },
                child: Text('Close'),
              ),
            ],
          ),
        ),
      ),
    );
  }

[Flutter]Drawerで画面遷移するには?
Drawerで画面遷移する方法を紹介します。
www.choge-blog.com
2021.11.06

[Flutter]AppBarのアイコンからDrawerを開くには?
AppBarのアイコンをタップしたときに、Drawerを開くには、どうしたら良いのでしょうか?
www.choge-blog.com
2021.10.09

[Flutter]AppBarにハンバーガーメニューを追加するには?
AppBarにハンバーガーメニューを追加するには、どうしたらいいのでしょうか?
www.choge-blog.com
2021.10.11

[Flutter]AppBarにサイドメニューを追加するには?
AppBarにサイドメニューを追加するには、どうしたらいいのでしょうか?
www.choge-blog.com
2021.10.11