どうも、ちょげ(@chogetarou)です。
CupertinoTabBarに枠線をつける方法を紹介します。
方法

CupertinoTabBarに枠線をつけるには、引数「border」を使います。
具体的には、CupertinoTabBarの引数「border」にBorderlクラスを指定します。
枠線の設定自体は、指定するBorderクラスで行います。
CupertinoTabBar(
  border: /*Borderクラスで枠線を指定*/,
  ・・・
),
引数「border」を使うことで、CupertinoTabBarに枠線をつけることが出来ます。
使用例
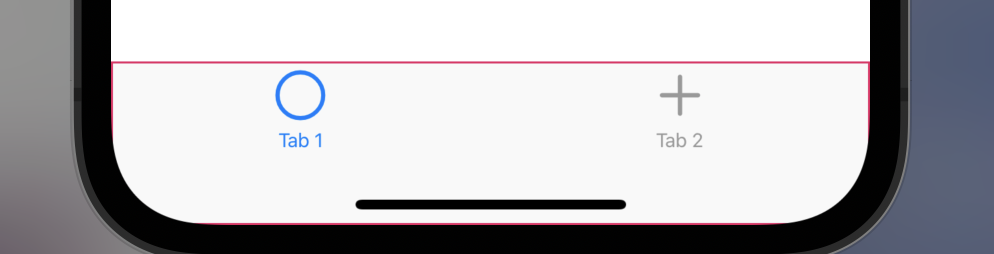
以下は、使用例です。
class MyHomePage extends StatefulWidget {
  @override
  _MyHomePageState createState() => _MyHomePageState();
}

class _MyHomePageState extends State<MyHomePage> {
  @override
  Widget build(BuildContext context) {
    return CupertinoTabScaffold(
      tabBar: CupertinoTabBar(
        border: Border.all(
          color: Colors.pink,
          width: 1.0,
        ),
        items: const <BottomNavigationBarItem>[
          BottomNavigationBarItem(
            icon: Icon(CupertinoIcons.circle),
            label: 'Tab 1',
          ),
          BottomNavigationBarItem(
            icon: Icon(CupertinoIcons.add),
            label: 'Tab 2',
          ),
        ],
      ),
      tabBuilder: (BuildContext context, int index) {
        return CupertinoTabView(
          builder: (BuildContext context) {
            return Center(
              child: Text('Content of tab $index'),
            );
          },
        );
      },
    );
  }
}
404 NOT FOUND | ちょげぶろぐ
www.choge-blog.com

[Flutter]CupertinoPickerの要素を真ん中に寄せるには?
CupertinoPickerの要素を真ん中に表示されるようにする方法を紹介します。
www.choge-blog.com
2022.01.23

[Flutter]CupertinoDatePickerの分の間隔を設定するには?
CupertinoDatePickerの分単位の間隔を設定する方法を紹介します。
www.choge-blog.com
2022.01.22

[Flutter]CupertinoAlertDialogの背景色を黒くするには?
CupertinoAlertDialogの背景色を黒くする方法を紹介します。
www.choge-blog.com
2022.01.22