どうも、ちょげ(@chogetarou)です。
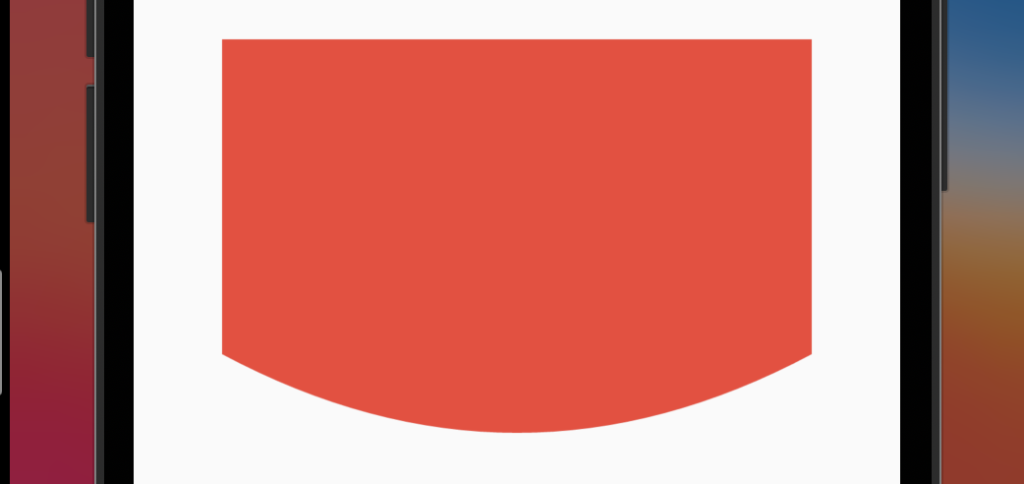
Containerの枠線の1部だけを曲線にする方法を紹介します。
方法
Containerの枠線の1部だけを曲線にするには、CustomClipperとClipPathを使います。
まず、CustomClipperを用意します。
class CurveClipper extends CustomClipper<Path> {
  @override
  Path getClip(Size size) { //引数で親ウェジェットのサイズを取得できる
        //切り抜きの設定
  }

  @override
  bool shouldReclip(CustomClipper<Path> oldClipper) => false;
}
次に、CustomClipperのgetClipに切り抜きの設定をします。
この時、1部の枠線が曲線になるようにします。
class CurveClipper extends CustomClipper<Path> {
  @override
  Path getClip(Size size) {
    int curveHeight = 40; //曲線の高さ

    Path path = Path()
      ..lineTo(0, size.height - curveHeight) //lineTo()は指定した座標まで直線を引く
      ..quadraticBezierTo(
        size.width / 2,
        size.height + curveHeight,
        size.width,
        size.height - curveHeight,
      )
//quadraticBezierTo(コントロールポイントのx座標, コントロールポイントのy座標, 最終地点のx座標,最終地点のy座標)
      ..lineTo(size.width, 0) //直線
      ..close(); //最初の位置まで戻る

    return path;
  }

  @override
  bool shouldReclip(CustomClipper<Path> oldClipper) => false;
}
Pathで切り抜く部分を設定し、そのPathを戻り値として返します。
ポイントは、quadraticBezierToで、このメソッドで曲線を引くことが出来ます。
最後に、ContainerをClipPathの「child」に指定し、ClipPathの引数「clipper」にCustomClipperを指定します。
ClipPath(
  clipper: CurveClipper(),
  child: Container(
    color: Colors.red,
    height: 200.0,
    width: 300,
  ),
),
使用したコード
class Test extends StatelessWidget {
  @override
  Widget build(BuildContext context) {
    return Scaffold(
      body: Center(
        child: ClipPath(
          clipper: CurveClipper(),
          child: Container(
            color: Colors.red,
            height: 200.0,
            width: 300,
          ),
        ),
      ),
    );
  }
}

class CurveClipper extends CustomClipper<Path> {
  @override
  Path getClip(Size size) {
    int curveHeight = 40;

    Path path = Path()
      ..lineTo(0, size.height - curveHeight)
      ..quadraticBezierTo(
        size.width / 2,
        size.height + curveHeight,
        size.width,
        size.height - curveHeight,
      )
      ..lineTo(size.width, 0)
      ..close();

    return path;
  }

  @override
  bool shouldReclip(CustomClipper<Path> oldClipper) => false;
}