どうも、ちょげ(@chogetarou)です。
Containerを重ねて表示する方法を紹介します。
方法

Containerを重ねて表示するには、Stackウェジェットを使います。
重ねて表示したウェジェットをStackの「children」の[]内にカンマ区切りで指定します。
Stack(
    children : [
         Container(),
         Container(),
         Container(),
         ・・・
    ]
)
childrenに指定したContainerは、後に指定したもの程、前面に表示されます。
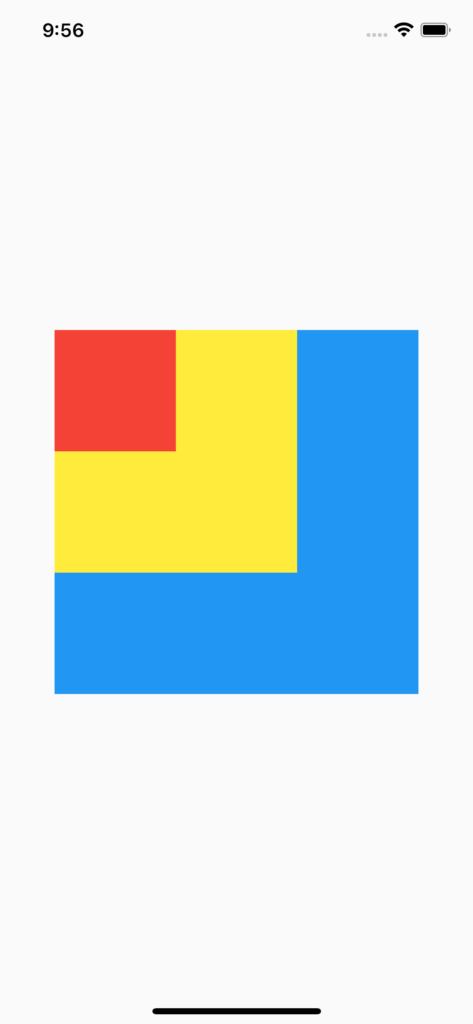
以下は、使用例です。
使用例
Stack(
  children: [
    Container(
      color: Colors.blue,
      width: 300,
      height: 300,
    ),
    Container(
      color: Colors.yellow,
      width: 200,
      height: 200,
    ),
    Container(
      color: Colors.red,
      width: 100,
      height: 100,
    ),
  ],
),
位置の調整
Containerウェジェットの位置を調整したい場合は、Alignウェジェットを使います。
まず、ContainerウェジェットをAlignの「child」に指定します。
そして、Alignの引数「alignment」に「Alignment」クラスで位置を指定します。
Align(
  alignment: /*Alignmentクラス*/,
  child: Container(),
),
Alignmentで位置を指定する方法は、2通りあります。
- Alignment(x, y)
中央を中心にして位置を指定する方法。
xに横方向の位置を指定。正の値を指定すると右、負の値を指定すると左に移動します。
yに縦方向の位置を指定。正の値を指定すると下、負の値を指定すると上に移動します。 - Alignment.位置
Alignmentの後にドット(.)を付けて、位置を指定する方法。
位置は、9個あります。
この2通りのどちらかで指定することで、位置を調整できます。
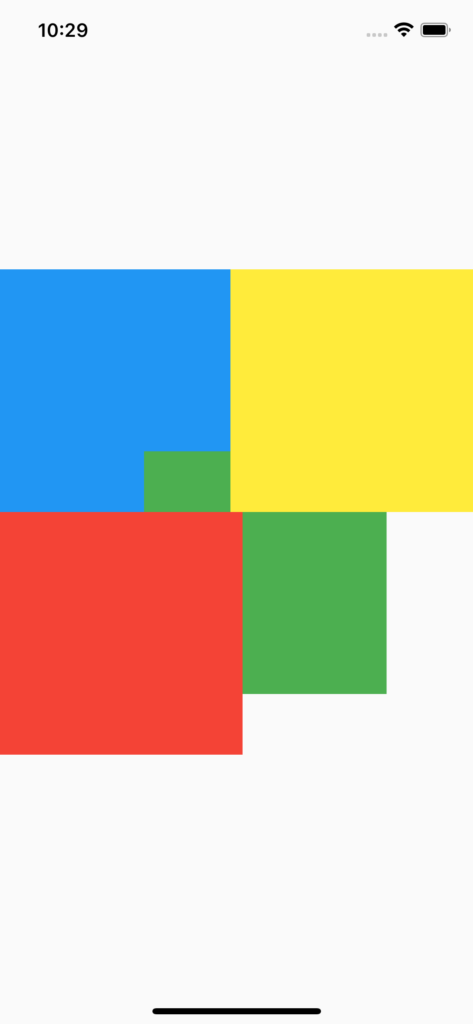
以下は、使用例です。
使用例
  @override
  Widget build(BuildContext context) {
    return Scaffold(
      body: Center(
        child: Container(
          width: 400,
          height: 400,
          child: Stack(
            children: [
              Align(
                alignment: Alignment(-1, -1),
                child: Container(
                  color: Colors.blue,
                  width: 300,
                  height: 300,
                ),
              ),
              Align(
                alignment: Alignment(0.25, 0.5),
                child: Container(
                  color: Colors.green,
                  width: 200,
                  height: 200,
                ),
              ),
              Align(
                alignment: Alignment.topRight,
                child: Container(
                  color: Colors.yellow,
                  width: 200,
                  height: 200,
                ),
              ),
              Align(
                alignment: Alignment.bottomLeft,
                child: Container(
                  color: Colors.red,
                  width: 200,
                  height: 200,
                ),
              ),
            ],
          ),
        ),
      ),
    );
  }