どうも、ちょげ(@chogetarou)です。
BottomNavigationBarを角丸にする方法を紹介します。
方法

BottomNavigaitonBarを角丸にする方法は3つあります。
BottomNavigationBar + ClipRRect
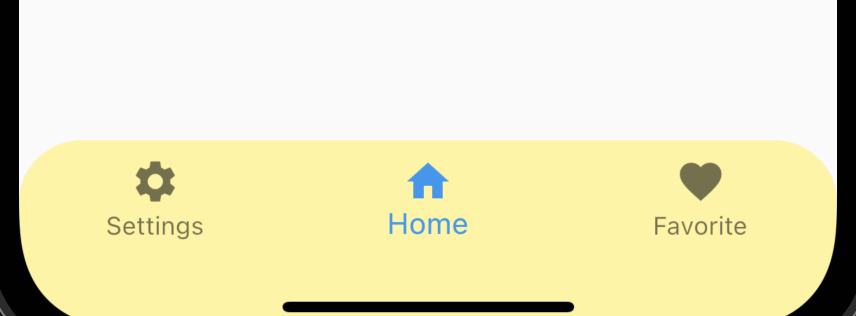
1つ目は、BottomNavigationBarとClipRRectを使う方法です。
まず、Scaffoldの引数「bottomNavigationBar」にClipRRectを指定します。
次に、ClipRRectの引数「child」にBottomNavigationBarを指定します。
そして、ClipRRectの引数「borderRadius」で角丸の設定をします。
  @override
  Widget build(BuildContext context) {
    return Scaffold(
      bottomNavigationBar: ClipRRect(
        borderRadius: BorderRadius.circular(30),
        child: BottomNavigationBar(
          backgroundColor: Colors.yellow[200],
          items: [
            BottomNavigationBarItem(
              icon: Icon(Icons.settings),
              label: 'Settings',
            ),
            BottomNavigationBarItem(
              icon: Icon(Icons.home),
              label: 'Home',
            ),
            BottomNavigationBarItem(
              icon: Icon(Icons.favorite),
              label: 'Favorite',
            ),
          ],
          currentIndex: _currentIndex,
          onTap: (int index) {
            setState(() {
              _currentIndex = index;
            });
          },
        ),
      ),
    );
  }
BottomAppBar + ClipRRect
2つ目は、BottomAppBarとClipRRectを使う方法です。
まず、Scaffoldの引数「bottomNavigationBar」にClipRRectを指定します。
次に、ClipRRectの引数「child」にBottomAppBar、引数「borderRadius」に角丸の設定を指定します。
そして、BottomAppBarの引数「child」にRowウェジェットを使ったタブを指定します。
  @override
  Widget build(BuildContext context) {
    return Scaffold(
      bottomNavigationBar: ClipRRect(
        borderRadius: BorderRadius.circular(30),
        child: BottomAppBar(
          color: Colors.blue,
          child: Row(
            mainAxisAlignment: MainAxisAlignment.spaceEvenly,
            children: [
              IconButton(
                onPressed: () {},
                icon: Icon(Icons.settings),
              ),
              IconButton(
                onPressed: () {},
                icon: Icon(Icons.home),
              ),
              IconButton(
                onPressed: () {},
                icon: Icon(Icons.favorite),
              )
            ],
          ),
        ),
      ),
    );
  }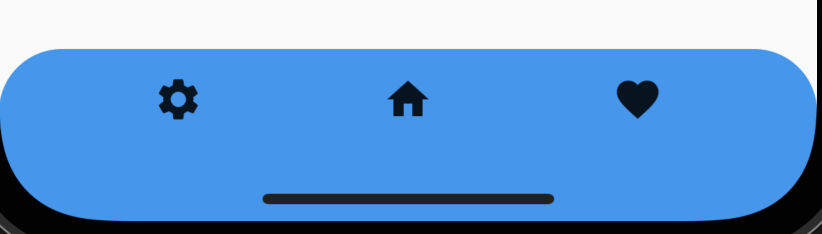
BottomNavigationBar + ClipRRect + extendBody
3つ目は、BottomNavigationBar、ClipRRectとScaffoldの引数「extendBody」を使う方法です。
まず、Scaffoldの引数「extendBody」にtrueを指定します。
そして、BottomNavigationBarをClipRRectでラップし、ClipRRectの引数「borderRadius」で角丸の設定をします。
Scaffold(
  extendBody: true,
  bottomNavigationBar: ClipRRect(
    borderRadius: BorderRadius.circular(30),
    child: BottomNavigationBar(
      items: [
        ・・・
      ],
      currentIndex: _currentIndex,
      onTap: (int index) {
        setState(() {
          _currentIndex = index;
        });
      },
    ),
  ),
);
まとめ
BottomNavigationBarを角丸にする方法は、次の3つです。
- BottomNavigationBar + ClipRRect
- BottomAppBar + ClipRRect
- BottomNavigationBar + ClipRRect + extendBody
[Flutter]BottomNavigationBarをタイトルテキスト無しにするには?
BottomNavigationBarをタイトルテキスト無しにする方法を紹介します。
www.choge-blog.com
2021.11.21
[Flutter]BottomNavigationBarの背景を透明にするには?
BottomNavigationBarの背景を透明にする方法を紹介します。
www.choge-blog.com
2021.11.20
[Flutter]BottomNavigationBarの背景に画像を設定するには?
BottomNavigationBarの背景に画像を設定する方法を紹介します。
www.choge-blog.com
2021.11.20