どうも、ちょげ(@chogetarou)です。
TabViewのタブバーの位置を上にする方法を紹介します。
方法

TabViewのTabBarの位置を上にするには、タブバーを自作します。
まず、自作のタブバーでTabViewを操作するための変数を用意します。
@State var selected = 0次に、TabViewの引数「selection」に用意した変数の参照を指定します。
TabViewの全てのビューにtag修飾子を付与し、値を割り振ります。
TabView (selection: $selected){
    Page1()
        .tag(0)
    Page1()
        .tag(1)
    Page1()
        .tag(2)
    ・・・・
}
最後に、タブバーを自作し、TabViewの上に配置します。
自作のタブバーのタブでは、タップ処理で変数を対応するページのtag修飾子の値に変更します。
VStack {
    CustomTabBar(selected: $selected) //上に配置
    TabView (selection: $selected){・・・}
}

~~~~~~~~~~~~~~~~~~~~~~~~~~~~~~~~~~~~~~~~~~~~~~~~~~~~~~

struct CustomTabBar : View {
    @Binding var selected : Int
    var body: some View {
        HStack {
            Button(action: {
                self.selected = 0 //ページのtagの値に変更
            }) { ・・・ }
            ・・・
        }
    }
}
使用例
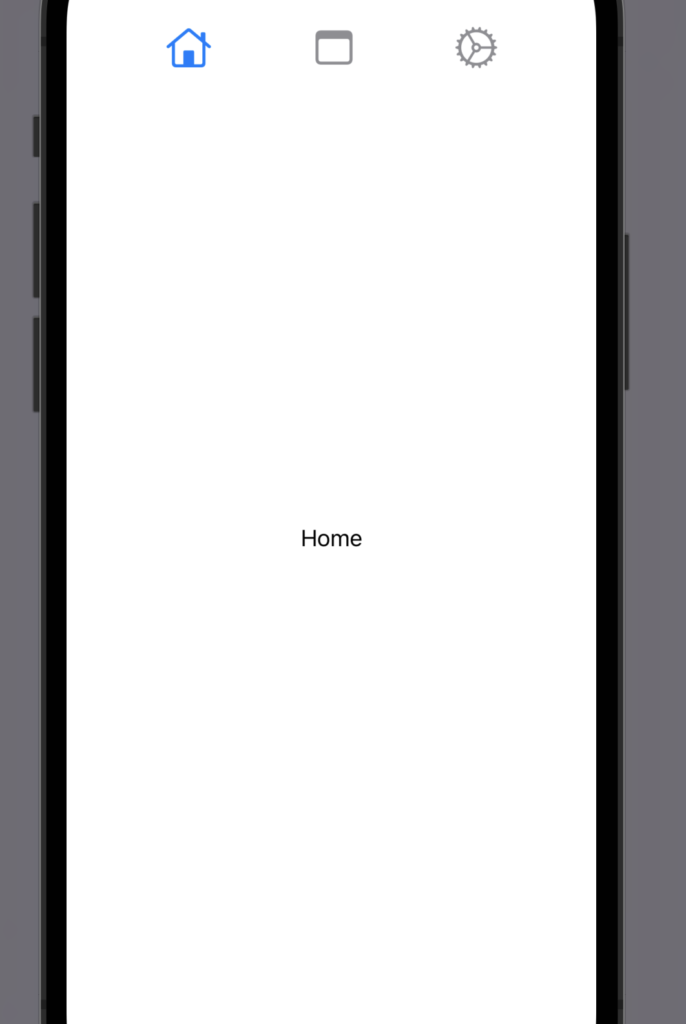
struct ContentView: View {
    @State var selected = 0

    var body: some View {
        VStack {
            CustomTabBar(selected: $selected)

            TabView (selection: $selected){
                Text("Home")
                    .tag(0)
                Text("Note")
                    .tag(1)
                Text("Settings")
                    .tag(2)
            }
        }
    }
}

struct CustomTabBar : View {
    @Binding var selected : Int
    var body: some View {
        HStack {
            Spacer()
            Button(action: {
                self.selected = 0
            }) {
                Image(systemName: "house")
                    .foregroundColor(selected == 0 ? Color.blue : Color.gray)
            }
            Spacer()
            Button(action: {
                self.selected = 1
            }) {
                Image(systemName: "note")
                    .foregroundColor(selected == 1 ? Color.blue : Color.gray)
            }
            Spacer()
            Button(action: {
                self.selected = 2
            }) {
                Image(systemName: "gear")
                    .foregroundColor(selected == 2 ? Color.blue : Color.gray)
            }
            Spacer()
        }
        .font(.title)
        .frame(height: 50)
    }
}


